I was looking for an excuse to get my hands dirty with NVidia CUDA. Turns out, its not that hard to wrap your head around if you know some C++ and parallel programming. Thanks to RustaCUDA, it can also be nicely used from Rust (because, why not?). In this little exercise I will implement a simple Voronoi pattern generator using both. Starting with a rather naive version (my first CUDA code ever) and then try to improve from there in the following posts. This will not be a complete and thorough CUDA tutorial, for those exist plenty in other places. I will try to handwave things just enough so you can follow along and look up the details elsewhere.
The full code is available at https://github.com/Droggelbecher/cuda-voronoi-exercise
RustaCUDA Voronoi
I’m skipping the “boring” parts here of downloading, installing, getting your paths correct and ensuring your CUDA version matches your GPU driver version. CUDA is, if you will, a C++ dialect that adds some special syntax for dealing with the kind of parallelization that GPUs offer. As such you can use the same “.cu” file for writing both host- and GPU code which is really nice.
In this little exercise however, I was curious on how easy it would be to bring some Rust into the game. As of this writing, the rust-cuda project is being rebooted and has some impressive examples to show off. In case you never heard about it: Its an attempt to execute your Rust code directly on the GPU to leverage all its performance. It is as of now still lagging a few CUDA versions behind and I felt for a first “dip your toes into CUDA” experiment, it was a bit too bleeding edge as of now.
So instead I turned my eyes to RustaCUDA which is more of a hybrid approach: You get to write your host code in Rust with a nice rusty CUDA interface and your CUDA code in a .cu file which you compile to .ptx and load with RustaCUDA. In our case, it looks basically like this:
// Initialize RustaCUDA and load our CUDA module from "kernel.ptx" into `module`

rustacuda::init(CudaFlags::empty())?;
let _context = Context::create_and_push(ContextFlags::MAP_HOST | ContextFlags::SCHED_AUTO, device)?;
let module = {
        let module_data = CString::new(include_str!("../kernel.ptx"))?;
        Module::load_from_string(&module_data)?
    };
let stream = Stream::new(StreamFlags::NON_BLOCKING, None)?;
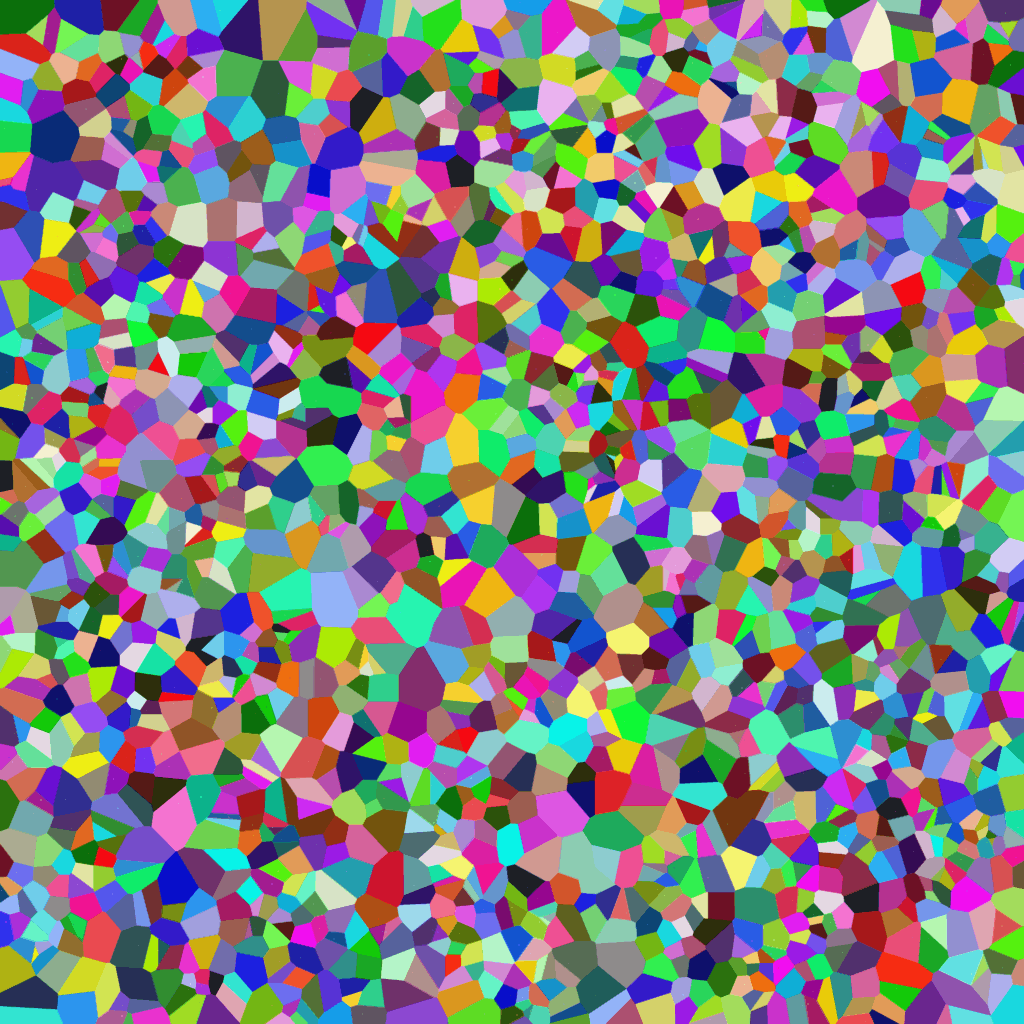
I was positively surprised by how little boilerplate code this is! Now for the actual problem we want to solve: Given a square map (a 2D array) and some random positions in that array we call “sites” or “centers” (I use both, sorry), assign each map position to its nearest site. This gives the typical Voronoi pattern you see in the image above. In my case I wanted the map to have a fixed size of 4096×4096 and varied the amount of sites to see how that affects performance.
Algorithm 01: Simple Scanning
A GPU can do a ton of parallel threads, so my first idea was: Lets just run a thread for each output position and have that thread go through all sites and choose the nearest one. This is perfect for a start because its simple enough to surely get functionally correct in the face of learning a new programming environment.
This is the CUDA kernel doing the actual work:
extern "C" __global__ void voronoi(int* cell, int width, int height, int n_centers, int* centers) {
    int x = blockIdx.x * blockDim.x + threadIdx.x;
    int y = blockIdx.y * blockDim.y + threadIdx.y;
    if (x >= width || y >= height) return;

    int threadIndex = x + y * width;

    // For 32-bit ints, this is 2**31.
    // This will not overflow if our map is smaller than 32768 x 32768:
    //     2 x^2 <= 2^31
    // <=> x <= sqrt(2^30) == 2^15 == 32768
    int closest_dist_sq = INT_MAX;

    // Iterate through all the centers and choose the closest one.
    int closest_center = -1;
    for(int ic = 0; ic < n_centers; ic++) {
        int cx = centers[ic * 2];
        int cy = centers[ic * 2 + 1];

        int dist_sq = (cx - x) * (cx - x) + (cy - y) * (cy - y);

        if(dist_sq < closest_dist_sq) {
            closest_center = ic;
            closest_dist_sq = dist_sq;
        }
    }

    cell[threadIndex] = closest_center;
}
This looks an awful lot like a C++ function but there are some differences. Most apparent, we get implicit blockIdx, blockDim and threadIdx variables. blockIdx tells us which block of threads we are in when running this, blockDim how many threads there are in a block and threadIdx where in the block we are. Conveniently, CUDA allows these indices to be 1-, 2- or 3-dimensional, depending on your application. Since we are thinking about a 2d map here, just using the x & y components seemed natural. This “function” (kernel) will be executed many times in parallel on your GPU so its also worth noting that it runs in a very different memory hierarchy than your normal CPU functions and some things such as dynamic allocations are either not available or very slow. There is a lot to say about this but for now let’s just make a mental note that we are talking about memory that is actually on the GPU and not on your main board so we need some way of copying the data.
So let’s turn our attention back to the host code. First we ask RustaCUDA to crate some device buffers, i.e. regions of memory on the GPU. The first one will be the list of Voronoi sites that we want to send to the GPU for solving. Here, that’s just an array of pairs of x- and y indices. The other one is the actual map we want to compute. Since with 4096*4096*size_of::<i32>() ~= 67MB this has a nontrivial size and should be computed on the GPU anyway, there is no point in copying anything from the host to the device, but rather we’ll create it uninitialized and convince ourselves that the kernel above will indeed initialize all indices.
    let mut d_centers = DeviceBuffer::from_slice(&problem.centers)?;

    // Create the output map unitialized on the GPU, our kernel
    // is expected to fill it completely.
    let map_size = (problem.map_size.0 * problem.map_size.1) as usize;
    let mut d_map = unsafe { DeviceBuffer::uninitialized(map_size)? };
Now we actually launch the kernel. While doing so we tell CUDA how many blocks we want and of what size. There are some implications to this choice, but for now we’ll just choose a block size of 32×32 and take as many of these as we need in order to cover our whole map. Launching CUDA code of course is unsafe from a rust perspective as that code could violate all sorts of safety constraints that Rust ensures for us.
    unsafe {
        launch!(
            // n blocks, block size, shared, stream
            module.voronoi<<<n_blocks, (BX as u32, BY as u32), 0, stream>>>(
                d_map.as_device_ptr(),
                problem.map_size.0,
                problem.map_size.1,
                problem.centers.len(),
                d_centers.as_device_ptr()
            )
        ).unwrap();
    }
Lastly, we’ll synchronize the stream (that is, wait for all kernel instances to be computed) and copy back the computed map from GPU to host memory:
    stream.synchronize()?;

    let mut map = vec![0; map_size];
    d_map.copy_to(&mut map)?;
A few lines of image library usage and assigning random colors to Voronoi sites later, we arrive at the title image, neat!
Performance and Next Steps
But how good is our approach? CUDA comes with a nice tool called nsys which can give us some details on how much time it spent and where. This is for my GeForce RTX 3070 Mobile, your milage will likely vary:
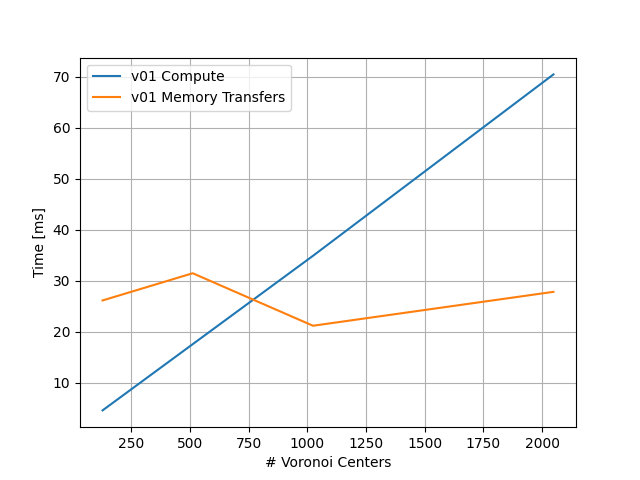
Memory transfer is largely determined by getting the map from the GPU but seems to vary a bit (perhaps because the very same GPU was controlling my screen at the same time). Compute time is the most linear graph I could have possibly asked for: The more Voronoi sites we have, the longer it takes for each map position to scan through all of them to find the closest one. Not inherently surprising, but makes you wonder whether that is necessarily the case. After all, most sites are pretty far away from a given point.
This gives us a very clear motivation for our next step: Can we find a way to make this more performant for high number of sites?